How to Photograph the Solar Eclipse
FOR IMMEDIATE RELEASE
August 18, 2017
Grant Collier, Collier Publishing LLC
6898 Taft Ct
Arvada, CO 80004
Phone: 303-984-0801
http://www.collierpublishing.com
http://www.gcollier.com
grant@collierpublishing.com
How to Photograph the Solar Eclipse
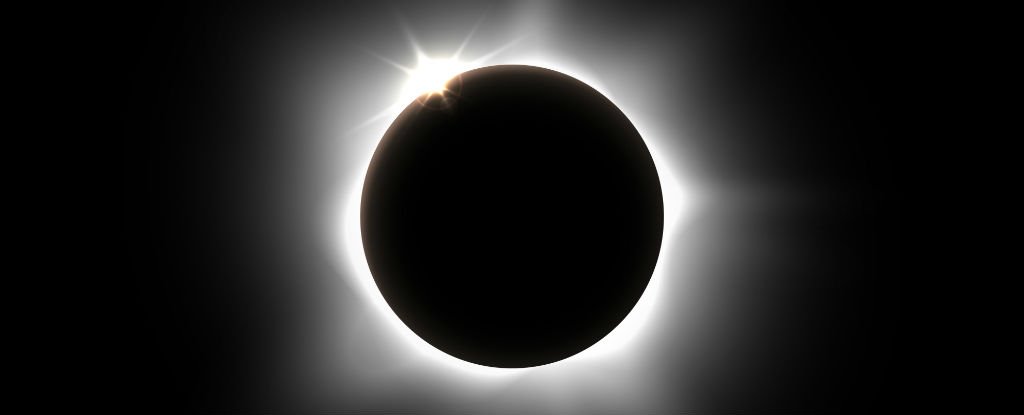
On August 21, millions of people will journey to a narrow strip of land across the U.S. to view the first total solar eclipse over the U.S. mainland since 1979. Many of these people will bring their cameras, hoping to capture images of this astounding event.
Longtime professional photographer Grant Collier offers advice on photographing the eclipse. Grant produces an annual “Starry Nights Wall Calendar” and is the author “Collier’s Guide to Night Photography,” which includes advice on photographing solar and lunar eclipses.
Q: What equipment should I bring?
A: If possible, you’ll want to bring a tripod and a digital SLR camera with a long telephoto lens of at least 300mm.
If you own a point-and-shoot camera or a camera phone, you can use it to capture a few quick snapshots of the eclipse using your camera’s automatic settings. Since it will be difficult to capture great shots of the eclipse with such a camera, you might be better off shooting the spectacle of all the people watching and shooting the eclipse. During totality, I’d recommend spending most of your time simply viewing the eclipse, as your camera won’t come close to capturing the amazing sight that you will see with your own eyes.
Regardless of the camera you use, make sure your flash is turned off. It will in no way help your images, and it will disrupt the viewing experience of those around you. If you’re not certain how to turn your flash off, you can simply place black electrical tape over the flash.
Q: What camera settings should I use on my digital SLR camera?
A: First, make sure your focus is set at infinity. You can do this by auto-focusing on the moon on a night prior to the eclipse, then taping your focus ring in place, and changing the lens to manual focus. If you have a solar filter for your camera, you can focus on the sun before the total eclipse begins. Make sure to remove the solar filter before shooting the total eclipse.
You should set your camera to manual exposure mode. I recommend using the widest aperture on your camera (like f5.6), ISO 100, and taking many, bracketed exposures at shutter speeds from about 1/4000 sec to ½ second. This will allow you to capture the enormous range of brightness in the sun’s atmosphere. You can later go through and pick out your favorite exposures.
If you want to get shots that look like the pros, you can trying blending all of the different exposures into a high-dynamic range (HDR) image. This may sound difficut, but software programs can now do most of the work for you. A couple I recommend are Adobe Lightroom and Photomatix. There are even some free programs, like Luminance HDR and Picturenaut.
Q: Do I need any special filters?
A: You won’t need any special filters on your camera during the total solar eclipse and should make sure all filters are off. However, if you want to capture the partial eclipse with a long telephoto lens before and after the total eclipse, you will need a solar filter. The sun will simply be too bright to capture good images without one, and it could even damage your camera sensor.
If you use a wide angle lens, including those that come with most camera phones and point-and-shoots, the sun will appear so small in the image that it doesn’t require a filter during the partial or total eclipse.
You should also use solar glasses whenever viewing the partial solar eclipse. You should take the glasses off during the total eclipse.
Q: Is it possible to include the land in an image with the eclipse?
A: The sun will be high in the sky throughout the eclipse, so it will be difficult to include the land in your shots. Unless you are an experienced photographer, I recommend focusing mainly on the eclipse, as that alone will be quite challenging to photograh in the short time you have.
If you do want to attempt this, the sun will be a little lower in the sky if you are near the West Coast of the United States. You can use software programs like Google Earth, The Photographer’s Ephemeris, and Stellarium to plan for the eclipse to be over a tall natural or manmade feature. Two possible locations I found are McGown Peak from Stanley Lake in Idaho and Mount Jefferson in Oregon (you’ll need to be just west of the mountain).
Since the sun will be so high, you will need to use a very wide angle lens and possibly stitch multiple images together to include the land in your image. To get the best results, you’ll need to use a program like Photoshop to combine an exposure (or multiple exposures) of the eclipse with an exposure of the rest of the scene. Again, this is quite difficult and best suited for photographers who have shot other eclipses or taken a lot of images at night.
Q: How can I practice beforehand?
A: It’s impossible to find anything quite comparable to an eclipse to practice taking images. However, you can practice by taking images of the moon on a night prior to the eclipse. This will give you an idea of how big the eclipse will appear in your image with different lenses. If you want to include the land in your images, the full moon will cast approximately the same amount of light on the land as the total eclipse, so it is a good way to practice capturing such images.
If you want to shoot the partial lunar eclipse using a solar filter, you can practice taking images of the sun on a day prior to the eclipse. If you do this, don’t look directly at the sun unless you have solar glasses.
You can also practice taking the bracketed exposures described above and get used to doing this as fast as you can, as the total eclipse will only last a couple minutes.
Q: What other creative options do I have for photographing the eclipse?
A: If you have a solar filter for you camera, you can take images of the various stages of the partial eclipse, and then create a composite image showing all of these stages, along with the total eclipse in the center.
You could also create a time lapse video by taking an image every 30 seconds or so during both the partial eclipse and every second or so during the total eclipse. Then create the video by playing all of the images you took at 10-30 frames per second. Software programs like Windows Movie Maker and iMovie make this fairly easy to do.
If you attempt either a composite or a time lapse, be sure to take your solar filter off during totality and put it back on when totality ends.
Q: What if it is cloudy during the eclipse?
A: If your plans are flexible, you can check the weather forecast beforehand and try to head to a spot where it is most likely to be clear. If you do get unlucky and the eclipse is obscured by clouds, the next total solar eclipse over the United States will occur in 2024. So, at least you won’t have to wait quite as long as usual between eclipses.
Find out more about Grant’s photography and his instructional book and videos on night photography at: www.collierpublishing.com.


Charleston Daily
Charleston Daily is a concept in community. Its mission is to promote, assist, and celebrate in everything Charleston, South Carolina. By partnering with businesses, community leaders, volunteers and events, we are spreading the love that is Charleston. As this city continues to grow and prosper, we want to help spread the message to all about how wonderful this community is. Charleston is about the people, community, water, land, history, heritage and the true southern warmth it brings with each and every day.